Why should I read about how to select an industrial camera, when I could just call 1stVision as a distributor of cameras, lenses, lighting, software, and cables, and let you recommend a solution for me?
Well yes, you could – and ultimately we believe a number of you who read this will in fact call us, as have many before. But when you take your car to the mechanic, do you just tell him “sometimes it makes a funny noise”? Or do you qualify the funny noise observation by noting at what speed it happens? When driving straight or turning in one direction? Whether it correlates to the ambient temperature or whether the vehicle is warmed up – or not?
The best outcomes tend to come from partnerships where both the customer and the provider each bring their knowledge to the table – and work together to characterize the problem, the opportunity, and the solution. In our many years of expertise helping new and returning customers create machine vision solutions, the customers with the best outcomes also make the effort to dig in and understand enough about cameras and other components in order to help us help them.

So how does one in fact choose an industrial or machine vision camera?
An industrial camera is a camera, often embedded in or connected to a system, used for commercial or scientific applications. Additionally, machine systems are often fully automated, or at least partially automated, with long duty cycles. Applications are many, ranging from surveillance, process control, quality control, pick and place, biomedical, manufacturing, and more.
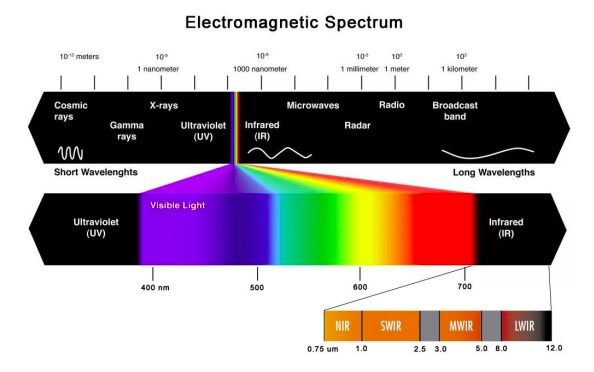
Further, the camera may be moving – or stationary, or the target might be moving – or stationary. And the wavelengths of light best-suited to achieving intended outcomes may be in the visible spectrum – the same spectrum we see – or the application may take advantage of ultraviolet (UV) or infrared (IR) characteristics.
So where to begin? First we need to characterize the application to be developed. Presumably you know or believe there’s an opportunity to add value by using machine vision to automate some process by applying computer controlled imaging to improve quality, reduce cost, innovate a product or service, reduce risk, or otherwise do something useful.
Now let’s dig into each significant consideration, including resolution, sensor selection frame rate, interface, cabling, lighting, lens selection, software, etc. Within each section we have links to more technical details to help you focus on your particular application.
Resolution: This is about the level of detail one needs in the image, in order to achieve success. If one just needs to detect presence or absence, a low resolution image may be sufficient. But if one needs to measure precisely, or detect fine tolerances, one needs a far more pixels that correlate to the fine-grained features from the real-world details being imaged.
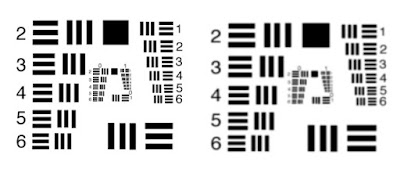
A key guideline is that each minimal real-world feature to be detected should appear in a 3×3 pixel grid in the image. So if the real-world scene is X by Y meters, and the smallest feature to be detected is A by B centimeters, assuming the lens is matched to the sensor and the scene, it’s just a math problem to determine the number of pixels required on the sensor. Read more about resolution requirements and calculations.
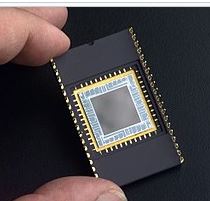
Sensor selection: So the required resolution is an important determinant for sensor selection. But so is sensitivity, including concepts like quantum efficiency. Pixel size matters too, as an influencer on sensitivity, as well as determining sensor size overall. Keys to choosing the best image sensor are covered here.
Wavelength: Sensor selection is also influenced based on the wavelengths being using in the application. Let’s assume you’ve identified the wavelength(s) for the application, which determines whether you’ll need:
- a CMOS sensor for visible light in the 400 – 700nm range
- a UV sensor for wavelengths below 400nm
- a Near Infrared sensor for 750 – 900nm
- or SWIR and XSWIR to even longer wavelengths up to 2.2µm
Monochrome or color? If your application is in the visible portion of the spectrum, many first-timers to machine vision assume color is better, since it would seem to have more “information”. Sometimes that intuition is correct – when color is the distinguishing feature. But if measurement is the goal, monochrome can be more efficient and cost-effective. Read more about the monochrome vs. color sensor considerations.
Area scan vs. line scan? Area scan cameras are generally considered to be the all-purpose imaging solution as they use a straight-forward matrix of pixels to capture an image of an object, event, or scene. In comparison to line scan cameras, they offer easier setup and alignment. For stationary or slow moving objects, suitable lighting together with a moderate shutter speed can produce excellent images.
In contrast to an area scan camera, in a line scan camera a single row of pixels is used to capture data very quickly. As the object moves past the camera, the complete image is pieced together in the software line-by-line and pixel-by-pixel. Line scan camera systems are the recognized standard for high-speed processing of fast-moving “continuous” objects such as in web inspection of paper, plastic film, and related applications. An overview of area scan vs. line scan.
Frame-rate: If your object is stationary, such as a microscope slide, frame rate may be of little importance to you, as long as the entire image can be transferred from the camera to the computer before the next image needs to be acquired. But if the camera is moving (drive-by-mapping, or camera-on-robot-arm) or the target is moving (fast moving conveyor belt or a surveillance application), one must capture each image fast enough to avoid pixel blur – and transfer the images fast enough to keep up. How to calculate exposure time?
Interfaces: By what interface should the camera and computer communicate? USB, GigE, Camera Link, or CoaXPress? Each has merits but vary by throughput capacity, cable lengths permitted, and cost. It’s a given that the interface has to be fast enough to keep up with the volume of image data coming from the camera, relative to the software’s capability to process the data. One must also consider whether it’s a single-camera application, or one in which two or more cameras will be integrated, and the corresponding interface considerations.
Cabling: So you’ve identified the interface. The camera and computer budget is set. Can you save a bit of cost by sourcing the cables at Amazon or eBay, compared to the robust ones offered by the camera distributor? Sometimes you can! Sometimes not so much.
Lighting: While not part of the camera per se, for that sensor you’re now liking in a particular camera model, can you get enough photons into the pixel well to achieve the necessary contrast to discern target from background? While sensor selection is paramount, lighting and lensing are just a half-step behind in terms of consideration with the most bearing on application outcomes. Whether steady LED light or strobed, bright field or dark field, visible or IR or UV, lighting matters. It’s worth understanding.
Filters: Twinned closely with the topic of lighting, well-chosen filters can “condition” the light to polarize it, block or pass certain frequencies, and can generally add significant value. Whether in monochrome, color, or non-visible portions of the spectrum, filters can pay for themselves many times over in improving application outcomes.
Lens selection: Depending on resolution requirements, sensors come in various sizes. While always rectangular in shape, they have differing pixel densities, and differing overall dimensions. One needs to choose a lens that “covers” the light-sensitive sections of the sensor, so be sure to understand lens optical format. Not only does the lens have to be the right size, one also has to pay attention to quality. There’s no need to over-engineer and put a premium lens into a low-resolution application, but you sure don’t want to put a mediocre lens into a demanding application. The Modulation Transfer Function, or MTF, is a good characterization of lens performance, and a great way to compare candidate lenses.
Software: In machine vision systems, it’s the software that interprets the image and takes action, whether that be accept/reject a part, actuate a servo motor, continue filling a bottle or vial, log a quality control image, etc. Most camera providers offer complementary software development kits (SDKs), for those who want to code camera control and image interpretation. Or there are vendor-neutral SDKs and machine vision libraries – these aren’t quite plug-and-play – yet – but they often just require limited parameterization to achieve powerful camera configuration and image processing.
Accessories: How about camera mounts? Wash-down enclosures for food-processing or dusty environments? If used outdoors, do you need heating or cooling, or condensation management? Consider all aspects for a full solution.
1st Vision’s sales engineers have over 100 years of combined experience to assist in your camera and components selection. With a large portfolio of lenses, cables, NIC card and industrial computers, we can provide a full vision solution!