Which Industrial camera would you use in low light?

OK vs NGOur job as imaging specialists is to help our customers make the best decisions on which industrial camera and image sensor works best for their application.  This is not a trivial task as there are many data points to consider, and in the end, a good image comparison test helps provide the true answer.  In this blog post, we conduct another image sensor comparison for low light applications testing a long time favorite e2V EV76C661 Near Infra Red (NIR) sensor to the new Sony Starvis IMX178 and Sony Pregius IMX174 image sensor using IDS Imaging cameras.

An Industrial camera can be easily selected based on resolution and frame rates, but image sensor performance is more challenging.  We can collect data points from the camera EMVA1288 test results and spectral response charts, but one can not conclude on what is best for the application based on one data point.  In many cases, several data points need to be reviewed to start making an educated decision.

We started this review comparing 3 image sensors to determine which ones would perform best in low light applications.

Below is a chart comparing the e2v EV76C661 NIR, Sony Starvis IMX178 and , Sony Pregius IMX174 image sensors found in the IDS Imaging UI-3240NIR, UI-3880CP and UI-3060CP cameras using EMVA1288 data to start. This provides us with accurate image sensor data to evaluate.

image sensor comparison
Table 1: Sensor comparison data
Spectral response cufves
Camera Spectral Response curves


We also look at the Quantum Efficiency (QE) curves for the sensors to see the sensor performs over the light spectrum as seen to the left.  (As a note, QE is the conversion of photon to an electrical charge (electrons)


For this comparison, our objective is to determine which sensor will perform best in low light applications with broadband light.  From table 1, the IMX178 has very low absolute sensitivity (abs sensitivity) with taking ~ 1 photon to help make a adequate charge, however the pixels are small (2.4um), so maybe not gather light as well as larger pixels.  It does have the best dark noise characteristics however.  In comparison, the e2V sensor has 9.9 photons  for abs sensitivity (not as good as 1 photon) and has a larger pixel size (bigger is better to collect light).  The IMX174 proves to be interesting as well with the largest pixel of 5.86um and the highest QE @ 533nm.

Using the data from the spectral response curves however, helps give us more insight across the light spectrum.  Given we are using a NIR enhanced camera, we will have significant more conversion of light to a create a charge on the sensor across most of the light spectrum.  In turn, we expect we’d see brighter images from the e2V NIR IDS UI-3240 NIR camera.

As a note, one more data point is to look at the pixel well depth.  Smaller pixels will saturate faster making the image brighter, so if other variables were close, this may also be taken into consideration.

As one can see, this is not trivial, but evaluating many of the data points, can give us some clues, but testing is really what it takes!  So, lets now compare the images to see how they look.

The following images were taken with the same exposure, lens + f-stop in the identical low light environment.  In the 2nd image, the e2v image sensor in the IDS-UI-3240CP NIR provides the brighter image as some of the data points started to indicate.  The IDS UI-3060CP-M (IMX174) is second best.

IDS UI-3880CP (IMX178)
IDS UI-3240CP NIR (e2v )
IDS UI-3060CP-M (Sony Pregius IMX174)

In low light situations, we can always add camera gain, but we pay the price of adding noise to the image.   Depending on the camera image sensor, some have the ability to provide more gain than others.  This is another factor to review when considering adding gain.  We need to also take into account read noise as this will get amplified with gain.   Our next part of our test is to turn up the gain to see how we compare.

The following set of images was taken again with the same lens + f-stop, lighting, but with gain at max for each camera.

IDS UI-3880CP with 14.5X gain
IDS UI-3240CP NIR with 4X gain
IDS UI-3060CP-M with 24X gain

The IDS-UI-3060CP-M has the highest gain available, but still keeps the read noise relatively low with 6 electrons.  This in low light WITH gain, gives us a nice image in nearly dark environments.

Conclusion
We can review the data points until we are blue in the face and they can be very confusing.  We can however take in all the data and help make some more educated decisions on which cameras to test.  For example in the first test, we had a good idea the NIR sensor would perform well looking a the QE curves along with other data.  In our second test, we may have seen the UI-3060CP had 24X gain vs others still with low read noise, giving an indication, we’d have relatively clean image.

In the end, 1st Vision’s sales engineers will help provide the needed information and help conduct testing for you!  We spend a lot of time in our lab  in order to provide first hand information to our customers!

Contact us

1st Vision is the leading provider of industrial imaging components with over 100 years of combined imaging experience.  Do not hesitate to contact us to discuss your applications!

Related Blogs

How do I sort through all the new industrial camera image sensors to make a decision? Download the sensor cheat sheet!


Just a few foot notes regarding this blog post:

Magnification of the images differs due to sensor size.  Working distance of the cameras was kept identical in all setups and focused accordingly with distance.

This topic can be very complex!  If we were to dig in even deeper, we’d take into consideration charge convergence of the pixel which effects sensitivity aside from looking at just QE!.. That’s probably another blog post!

As a reference, this image was taken with an Iphone and set to best represent what my eye viewed during our lab test.  Note that the left container with markers was non-distinguishable to the human eye

Clipart courtesy of clipartextra.com

Allied Vision Manta G-040 & G-158 provide great replacements to legacy CCD cameras

Allied Vision is Allied vision industrial camera
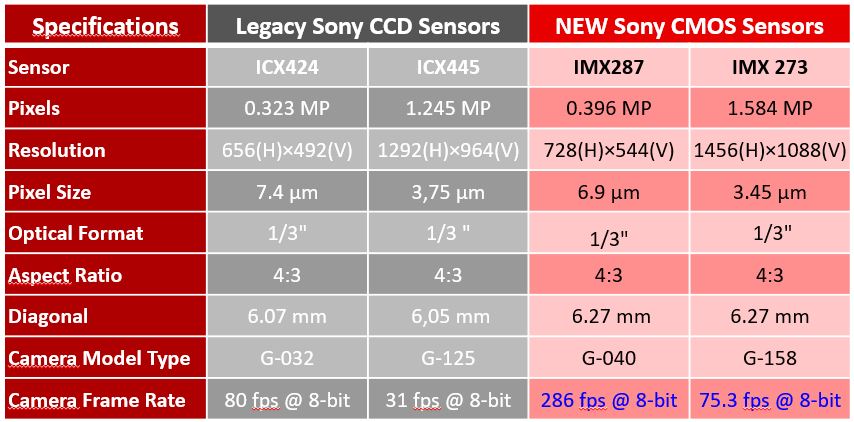
expanding  its line of Manta machine vision cameras, releasing the Manta G-158 and Manta G-040 GigE Vision cameras.  Featuring the second generation Pregius CMOS image sensors from Sony.  These are great replacements for Legacy Sony ICX424 and Sony ICX445 image sensors found in the Manta G-032 and Manta G-125 cameras.

The G-158 camera features the 1.58 megapixel Sony IMX273 image sensor, which has a 3.45 µm pixel size and achieves a frame rate of 75.3 fps. The Manta G-040 camera features the 0.4 megapixel Sony IMX287 image sensor, which has a 6.9 µm pixel size and achieves a frame rate of 286 fps. Higher frame rates can be achieved on both models in burst mode.

Contact 1st vision for pricing

Allied Vision Manta Specifications and comparisons to older Sony CCD sensors as follows:


Allied Vision Manta features include:

  • Power over Ethernet options (PoE) with Trigger over Ethernet for single cable solutions
  • Angled Head and Board level variations allowing for custom OEM designs
  • Video-Iris lens control for challenging lighting conditions
  • Three look up tables (LUT)
  • Gige Vision compliant with support for popular third party image processing library’s including Cognex VisionPro, Mathworks, MATLAB and National Instruments

To Learn More about the Allied Vision Manta cameras

View more information on the G-158.
View more information on the G-040.

UPDATE:  See this new video from Allied Vision (6/19/18)

1st Vision’s sales engineers have over 100 years of combined experience to assist in your camera selection.  With a large portfolio of lenses, cables, NIC card and industrial computers, we can provide a full vision solution!

Contact us

Additional References:

What are the attributes to consider when selecting a camera and its performance?

Need higher resolution? – Learn about Allied Vision’s high-resolution Prosilica GT now with 12, 16 and 25MP ON Semi PYTHON sensors

Visit our “Knowledge Base” to learn more about camera technology, machine vision lenses and lighting.


How do I sort through all the new industrial camera image sensors to make a decision? Download the sensor cheat sheet!

industrial camera decision

industrial imaging sensor decisionThe latest CMOS image sensor technology from Sony and ON-SEMI have continued to expand the industrial camera market.  Sony has now reached its 3rd Generation Pregius sensors in addition to adding the low light performer, Starvis sensor.  ON-SEMI has also continued with higher resolutions and has the next generation in the works.

Given all these new sensors, we are often asked, “What is the best image sensor and camera for my application”?  

Although there are many considerations in general on selecting a camera (i.e Interface, Size, Color vs Mono etc), its best to start with the characteristics of  image sensor and performance.  Knowing the answers to questions relating to amount of available light, dynamic range requirements, wavelengths involved, and the type of application, the right sensor can start to be identified.  From there, we can select a camera with the appropriate sensor fitting other requirements such as interface, frame rate, bit depths etc.

In order to help pick a sensor, its extremely important to have the image sensor data that can be found on the EMVA1288 data sheets.  We have continued compiling this data into a “cheat sheet” along with required lens recommendations and comments how how some sensors relate to each other and older CCD sensors for your download.

industrial camera image sensor cheat sheet

The data shows us that not all industrial camera image sensors are created equally!  Within the Sony Pregius sensors, there is 1st and 2nd Generation sensors both having unique characteristics.  The 1st Generation provided great pixel well depth and dynamic range with 5.86um pixels.  The 2nd generation came along with smaller 3.45um pixels,  improved sensitivity and lower noise, but less well depth.  The next generation will have the best of both worlds.. more to come on that front.

Using this data as an example, if we had an application with a “fixed” amount of light and wanted a relatively bright image (given a fixed aperture and just considering sensor characteristics), what sensor is best?   Answer:  We’d probably look at Model A with a smaller well depth as the pixel will start to saturate faster than Model C.  Or possibly we have a very small amount of light?  We’d start looking at absolute (abs) sensitivity which tells us the smaller # of photon’s, 1.1 in this case, starts to provide a useful signal.

Example comparisons: 
industrial imager comparison
Don’t let yourself get frustrated trying to figure this out on your own!    1st Vision’s engineers have combined experience in the machine vision and imaging market of over 100 years!   Our team can help explain the various technical terms mentioned in this post and help in selecting the best image sensor and camera for an application.

Contact 1st Vision

Related Blog posts

What are the attributes to consider when selecting a camera and its performance?

IMX174 vs Starvis IMX290 – Battle of the 2 Megapixel Image sensors – Sony Pregius IMX174 vs Starvis IMX290

IMX174 vs CMOSIS CMV2000 – CMOS battle between 2MP Sony Pregius and CMOSIS

IMX250 vs ICX 625 – 5MP’s sensor battle between Sony’s older CCD vs new CMOS model

What are global shutters and rolling shutters in machine vision cameras? How can we use lower cost rolling shutter cameras?

machine vision cameras shuttersWe often are asked the question, “What is the difference between a global and rolling shutter image sensor in machine vision cameras? ”  Although they both take nice pictures, they are very different image sensors with pro’s and con’s of each.  In the end, rolling shutter image sensors cost less, but are not always recommended for moving objects.

In this blog post, we will explain the differences between global and rolling shutter sensors used in machine vision cameras.  Additionally, we highlight how to use a rolling shutter camera capable of  “Global Reset”  providing low cost solutions for some applications with moving objects.

First, let’s explain the differences between rolling shutter vs global shutter image sensors in machine vision cameras.

Global Shutter:  Image sensors with a global shutter allow all of the pixels to accumulate a charge with the exposure starting and ending at the same time.  At the end of the exposure time the charge is read out simultaneously.  In turn, the image has no motion blur on moving objects.  This is given the exposure is short enough to stop pixel blur which is a topic for another blog.
Global shutter image

Rolling shutter:  Image sensors with a rolling shutter do NOT expose all the pixels at the same time.  Alternatively, they expose the pixels by row with each row having a different start and end time frame.  The top row of the pixel array is the first to expose, reading out the pixel data followed by the 2nd, 3rd & 4th row and so on.  Each of the rows start and end point have a delay as the sensor is fully read out.  The result of this on moving objects is a skewed image
Rolling shutter image

What are the Pro’s and Con’s of each type of shutter?

Global Shutter:  
Pro:  Freeze Frame images with no blur on moving objects.

Con:  Global shutter sensors require more complicated circuit architecture, thus limiting the pixel density for a given physical size.  In turn, sensors with a global shutter will have a larger image format driving up lens cost.  The complicated circuits also drive up the overall camera cost and will be more expensive vs a rolling shutter sensor.

Rolling Shutter:
Pro:  Rolling shutter sensors have a simpler design with smaller pixels, allowing higher resolution in a smaller image format allowing use of lower cost lenses. The simpler pixel design results in lower camera costs!.. For example, Dalsa’s 18MP Nano for < $600!

Con:  Image distortion occurs due to the row by row integration and offset on moving objects.  Smaller pixels may also require a higher quality lens which is commonly gauged by the lens Modular Transfer Function (MTF).  This is really dependent upon your application and can be discussed with a sales engineer In turn, there maybe a small trade off to consider.

Is there a way to use a lower cost rolling shutter camera on moving objects?  Absolutely using a Global Reset mode found in various image sensors.

Using a rolling shutter capable of a “Global Reset” such as the AR1820HS found in the 18MP Teledyne Dalsa Nano C4900 camera will eliminate the image distortion.

A typical rolling shutter image sensor as described above exposes sensor rows separately with a delay as depicted below.
rolling shutter mode

Using a rolling shutter with global reset mode, all rows start integrating at the same time as shown below eliminating the image distortion.  It is highly recommended however to use a dedicated strobe and sync with the start of image acquisition.  A gradient in the image brightness from top to bottom maybe seen if not with some pixel blur due to longer row exposure
rolling shutter with global reset mode

A great camera to consider is the 18MP Teledyne Dalsa Nano C4900 camera.  This camera features the ON-SEMI AR1820HS sensor with this capability.  With a price point of < $600, this makes it one of the lowest cost cameras per pixel on the market.

contact us

1st Vision has over 100 years of combined experience and can help you with camera, lens and other peripheral recommendations.  If you have questions regarding the various sensor shutters, please do not hesitate to contact us!

Be sure to read our related blog posts:

What is a lens optical format? Can I use any machine vision camera with any format? NOT!

Demystifying Lens performance specifications – MTF