IDS peak 2.17.1 / uEye+ firmware 3.70
IDS Peak comfortSDK, genericSDK, IPL, and AFL developer manuals are external documents. Please contact us if you need them.
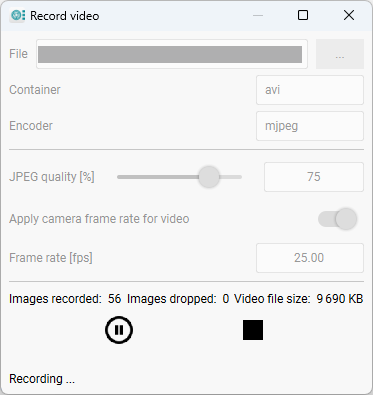
You can use the IDS peak Cockpit to record video sequences.
1.Click ![]() in the main menu.
in the main menu.
⇨The "Record video" dialog opens.
2.Define the name and the directory for the video under "File".
The video is created as an AVI file with MJPEG encoding.
3.You can set the quality of the JPEG image compression under "JPEG" (100 % = highest quality/largest file size, default = 75 %).
4.You can either use the frame rate of the camera for the video or define a different frame rate for the video under "Frame rate".
Note that the video frame rate indicates the speed of playback. It does not change the frame rate of the camera. Each image acquired by the camera will be added to the video.
5.Click on ![]() to start video recording.
to start video recording.
⇨In the title bar of the camera window, a red dot in the upper left corner indicates that a video recording is in progress.
In the " Record video" dialog, the (successfully) captured images as well as the lost images are displayed in the lower area. You can also see the current size of the AVI file in kilobytes (kB).
6.Click on ![]() to finish video recording. Press
to finish video recording. Press ![]() to pause a video recording without finishing it.
to pause a video recording without finishing it.
After you finish video recording, the AVI file will be saved.

Fig. 267: Record a video
Notes on video recording
•Only 8-bit pixel formats can be used for video recording (see Host features).
•While video recording is in progress, you cannot change the image height, width, or pixel format.