IDS Software Suite 4.96.1
The data network and the camera network should be cabled separately. Therefore, we recommend connecting the GigE uEye cameras by a separate network card. You can configure the GigE uEye camera and the network card in the IDS Camera Manager. The following example shows the proceedings:
1.Open the IDS Camera Manager via "Start > All Programs > IDS > IDS Camera Manager".
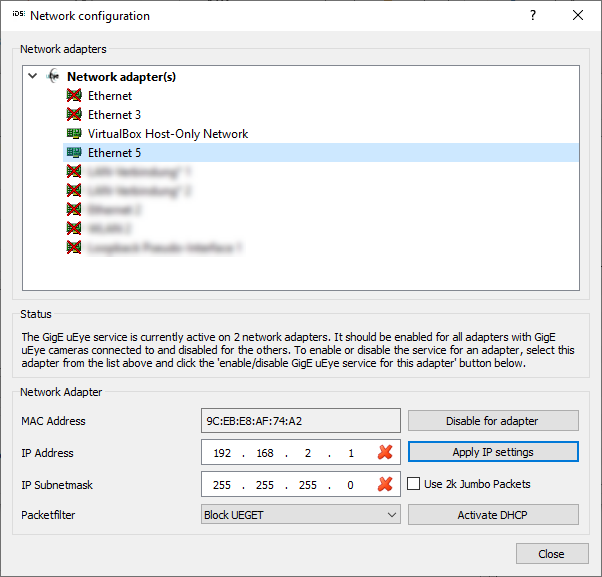
2.Click on "ETH network service".
3.Select the network card to be used with the GigE uEye camera.

Fig. 85: Configuring the network card
4.Below "IP Address" set a static IP address for the network card, e.g. "192.168.2.1".
5.Below "IP Subnetmask" set the network mask, e.g. "255.255.255.0".
6.Optional: If you select the "Use 2K jumbo packets" option, the camera will transfer the image data in larger packets. These packets, called jumbo packets, have a size of 2 KB (2048 bytes) and can increase the data throughput, depending on the hardware used.
|
To use jumbo packets with uEye cameras, set a packet size of at least 2048 bytes in the settings of the network adapter you are using. Note that the connection between the GigE uEye camera and the PC must continuous be able to transport jumbo packets to ensure the transmission of the jumbo packets. Information on these settings is provided in the manual supplied with the network adapter. |
7.Click on "Apply IP settings".
Now you can configure the camera. Therefore, two possibilities are available:
Automatic configuration
1.Select the camera in the camera list. Therefore, the camera must be connected and must have a power supply. The camera is marked with an exclamation point in the camera list.
2.Click on "Automatic ETH configuration" in the IDS Camera Manager. After completion of the automatic configuration the camera is displayed in the camera list without exclamation point. Now you can use the camera.
Manual configuration
|
The "Manual ETH configuration" option is only available if you enable the Expert mode in the IDS Camera Manager. |
1.Select the camera in the camera list. Therefore, the camera must be connected and must have a power supply. The camera is marked with an exclamation point in the camera list.
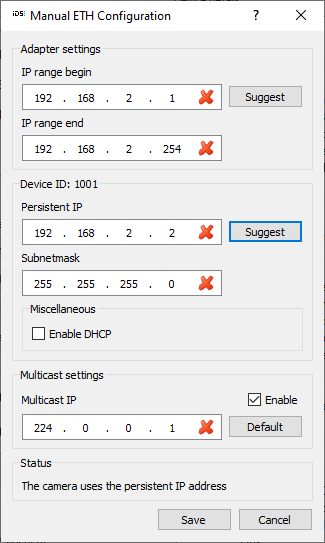
2.Click on "Manual ETH configuration" to open the dialog for the IP configuration.
3.Click on "Suggest" below "Adapter settings". The range of the previously configured network card is displayed.

Fig. 86: Manual configuration
4.Below "Device ID" you can set a persistent IP address for the camera. If you do not make any changes the camera will use an IP address from the IP range of the adapter settings.
5.Activate the "Enable DHCP" option so that the camera obtains its IP address from a DHCP server.
6.Click on "Save" to apply the settings.
|
To use a persistent IP address click on "Suggest". An IP address is suggested that matches to the settings of the network card. You can also enter an IP address, e.g. "192.168.10.2". The subnetmask is added automatically. |
